Controlling Colour Temperature and Tint on Mobile Devices

How colour temperature changes a scene.
In our recent blog posts we explored how colour temperature and tint affect the mood of a photograph. A slight shift towards warm yellow light can make an image feel welcoming and nostalgic, while a cooler blue tone can feel calm or dramatic. Similarly, small changes in tint (green or magenta) can subtly influence how natural a scene appears.
The good news is that modern mobile phones give us a surprising amount of control over colour, both when taking the photo and afterwards during editing.
Let’s look at both approaches.
1. Adjusting Colour at the Moment of Capture
Most mobile phones automatically try to neutralise colour casts using automatic white balance. This usually works very well, but sometimes the camera’s interpretation is not what you want.
For example:
Indoor lighting may look too yellow
Sunset colours may be neutralised and lose their warmth
Snow scenes may appear slightly blue
In these cases you can override the automatic behaviour.
Using “Pro” or “Manual” Camera Modes
Many phones now include a Pro or Manual mode in their camera app. This allows you to adjust settings similar to those found on traditional cameras.
Look for a control labelled:
WB (White Balance)
You will usually see options such as:
Auto
Daylight
Cloudy
Tungsten
Fluorescent
Choosing one of these tells the camera what colour of light you are shooting in.
For example:
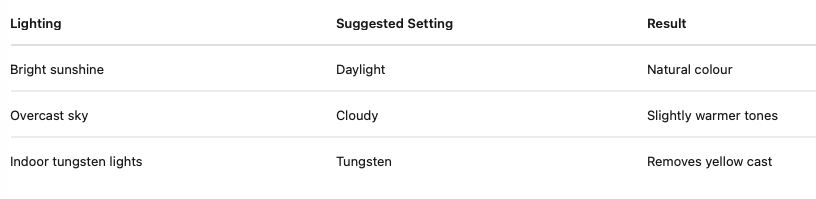
Some phones also allow you to adjust colour temperature directly using a Kelvin scale (for example 3200K–6500K).
Lower numbers produce warmer images, higher numbers produce cooler images.
Creative Use of White Balance
White balance does not have to be “correct”. You can use it creatively.
Examples:
• Choose Cloudy to make autumn scenes richer and warmer
• Choose Tungsten outdoors to produce a dramatic cool blue tone
• Increase warmth slightly during sunset to emphasise the golden light
In other words, white balance is not just technical — it can also be a creative tool.
2. Adjusting Colour After the Photo Is Taken
Often the easiest place to refine colour is during editing. Mobile photo apps provide excellent control over colour temperature and tint.
You can do this in many apps including:
• Apple Photos
• Google Photos
• Lightroom Mobile
• Snapseed
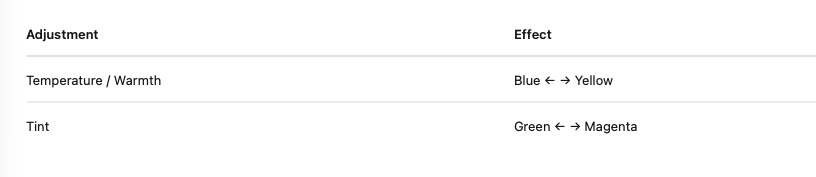
Look for sliders labelled:
Warmth / Temperature
Tint
These usually behave as follows:
A Simple Editing Method
When editing colour, a simple workflow works well:
Correct the temperature first
Adjust warmth until the image looks natural.
Fine-tune tint
Remove any slight green or magenta cast.
Check skin tones or neutral objects
White walls, clouds, or skin tones often reveal colour problems.
Avoid over-correction
Slight warmth usually feels natural; extreme colour shifts can look artificial.
3. Shooting RAW on Mobile Devices
Many modern phones allow you to shoot RAW or ProRAW images.
RAW files retain more colour information and give you greater flexibility when adjusting temperature and tint during editing.
This is especially useful when photographing:
• Sunsets
• Indoor scenes with mixed lighting
• Night photography
• Difficult lighting conditions
If your phone offers a RAW option, it can be worth enabling it for photographs you care about.
Looking Ahead
In the next article I will look at how colour temperature and tint are controlled on traditional cameras, where the same principles apply but with slightly different tools and terminology.